

Everything Guitarists Need to Know About Thirds and Sixths
The theory, the fretboard shapes, the B string problem, and the exact practice approach that makes it stick.

You’ve heard thirds and sixths all over rock and country music. The intro to “Brown Eyed Girl” by Van Morrison. John Mayer’s main line in “Belief.” The rhythm guitar in “I Want You Back” by The Jackson 5.
They show up everywhere. A lot of the time, you’ll use them in rhythm playing.
If you’re not sure what I’m talking about, give those songs a listen and leave a comment. I’ll add more examples to help you hear what we’re working on.
This guide will get you started learning 3rds and 6ths in every key, all over the fretboard.
Before we start, I want to talk about the the fact that…
only what is deeply familiar is available to you when you perform and create.
The only way to use these intervals in a musical way is to know them. In theory AND on the fretboard. I’m going to show you the blind spots I’ve struggled with on the guitar when it comes to certain keys and certain areas of the neck, and how to work through them.
Like everything worthwhile, this takes patience and consistency.
1. What Is an Interval?
An interval is the distance between two notes.
That’s it.
Like a mile measures physical distance, an interval measures musical distance.
When you play two notes one after the other (like a melody), that’s a melodic interval. When you play them at the same time (like a chord), that’s a harmonic interval.
Here’s what makes this powerful on the guitar: On a fretted instrument, intervals become shapes. And those shapes reoccur across the entire fretboard. No matter what key you’re in, the shapes stay consistent.
We use that to our advantage.
That doesn’t mean we skip learning the notes. It doesn’t mean we skip learning the keys. But the consistent shapes help build muscle memory. Your mind can relate what you’re hearing to what you’re playing because the physical pattern is the same.
2. Understanding Thirds and Sixths
What They Are
The traditional way of understanding a Major Third is the distance from the root to the third degree of a major scale. In the key of C, that’s C to E. That’s 4 semitones.
A Minor Third is the same interval, but you reduce the distance by a half step. Instead of 4 semitones, it’s 3 semitones. In the key of C, that would be C to Eb.
Sixths work the same way. A Major Sixth is the distance from the root to the sixth degree of a major scale. In C, that’s C to A—9 semitones.
A Minor Sixth is that same interval reduced by a half step. So instead of 9 semitones, it’s 8 semitones. In C, that would be C to Ab.
You’ve heard all of these intervals before, even if you didn’t know what to call them. Putting names to the sounds is the foundation to developing your ear to identify 3rds and 6ths.
Where They Live Inside Triads
If you know your triads, you already have thirds and sixths in your hands. If you want a refresher, I wrote about them earlier this year.

I’m going to show you where they show up inside the chord shapes you’re already playing.
Root Position:
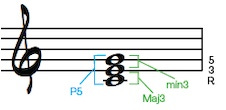
Every triad in root position shows you both thirds. You’ve got one third from the root to the 3rd, and another third from the 3rd to the 5th.
Take a C Major chord in root position (C-E-G). The interval from C to E is a Major 3rd. The interval from E to G is a Minor 3rd. Both thirds, right there in the chord.
First Inversion:
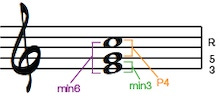
When you flip the chord to first inversion, the two outer notes create a sixth.
C Major in first inversion gives you E-G-C. The outside notes are E and C. That interval is a Minor 6th.
Second Inversion:
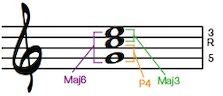
Same idea. The outer notes give you a sixth.
C Major in second inversion is G-C-E. The outside interval, G to E, is a Major 6th.
Learning triads is a good prerequisite for this work. The more familiar you are with triad shapes and inversions, the easier it’ll be to see these intervals.
3. Shapes on the Guitar: Playing Thirds and Sixths Across the Fretboard
Now we’re taking what we know about intervals inside triads and moving them across the fretboard. We’ll use the key of F to show you how this works.
I’m going to show you three different chord scale approaches, each one starting from a different triad inversion. The diagrams will show you where the thirds and sixths live as you move through the key horizontally.
Starting from the root and 3rd of an F major triad in root position (F-A-C), we’ll move up through the key using the chord shapes. You’ll see the thirds stacked inside each triad as you climb.


First Inversion F Chord → Chord Scale Moving Up:
Now we start from F major in first inversion (A-C-F). Same key, different starting point. As you move through the chord scale horizontally on this string set, you’ll see the sixths appear between the outer notes of each triad.

Second Inversion F Chord → Chord Scale Moving Up:
Starting from F major in second inversion (C-F-A), we’ll move through the key on the same string set. Again, the outer intervals give you sixths as you work through the progression.

This is where the fretboard opens up. You’re seeing the same intervals (thirds and sixths) in different positions, different string sets, all in the same key. The shapes are consistent—they just move to different locations depending on where you start.
4. The B String Problem (And How to Fix It)
Here’s where most guitarists get tripped up with interval shapes.
You learn a shape that works perfectly on the lower strings. Then you try to play the same interval higher up the neck, and suddenly the shape doesn’t work. The interval sounds wrong.
Why the B String Is Different
Standard guitar tuning goes: E-A-D-G-B-E (low to high).
Most adjacent string pairs are tuned a Perfect 4th apart, that’s 5 semitones:
E to A = Perfect 4th
A to D = Perfect 4th
D to G = Perfect 4th
B to E = Perfect 4th
But the G to B strings are tuned a Major 3rd apart, only 4 semitones.
This is the anomaly. And it changes everything about how interval shapes work when you cross from the G string to the B string.
What This Means for Your Shapes
When you learn an interval shape on strings tuned a Perfect 4th apart, that shape accounts for the 5-semitone gap between the strings.
But when you cross from the G string to the B string, that gap shrinks to 4 semitones. You lose one semitone.
To play the same musical interval across the G-B boundary, you need to compensate by shifting the shape up one fret.
How It Works: Major Thirds
Let’s look at a Major Third (4 semitones) played on two different string pairs.
Major 3rd WITHOUT the B string (D and G strings):
E on the D string (4th string), 2nd fret
G# on the G string (3rd string), 1st fret
Shape: Up one string, down one fret
E on the E string (6th string), 12th fret
G# on the A string (5th string), 11th fret
Shape: Up one string, down one fret
E on the A string (5th string), 7th fret
G# on the D string (4th string), 6th fret
Shape: Up one string, down one fret
E on the B string (2nd string), 5th fret
G# on the E string (1st string), 4th fret
Shape: Up one string, down one fret
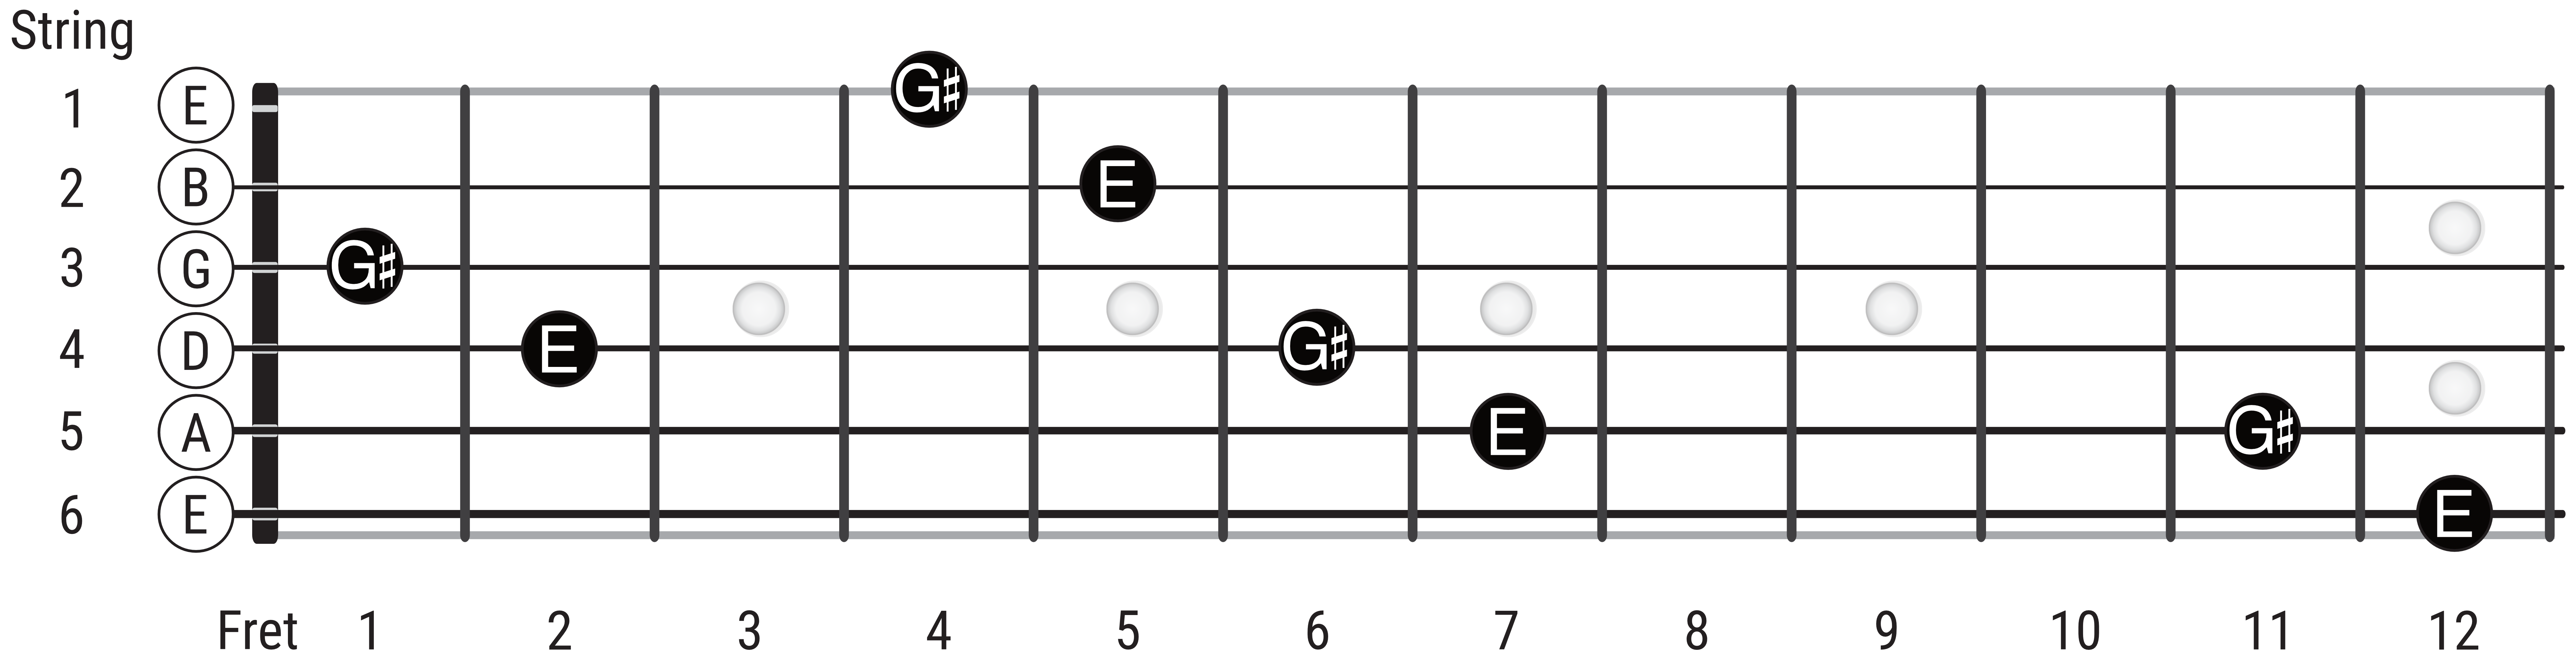
Major 3rd CROSSING to the B string (G and B strings):
E on the G string (3rd string), 9th fret
G# on the B string (2nd string), 9th fret
Shape: Up one string, SAME fret
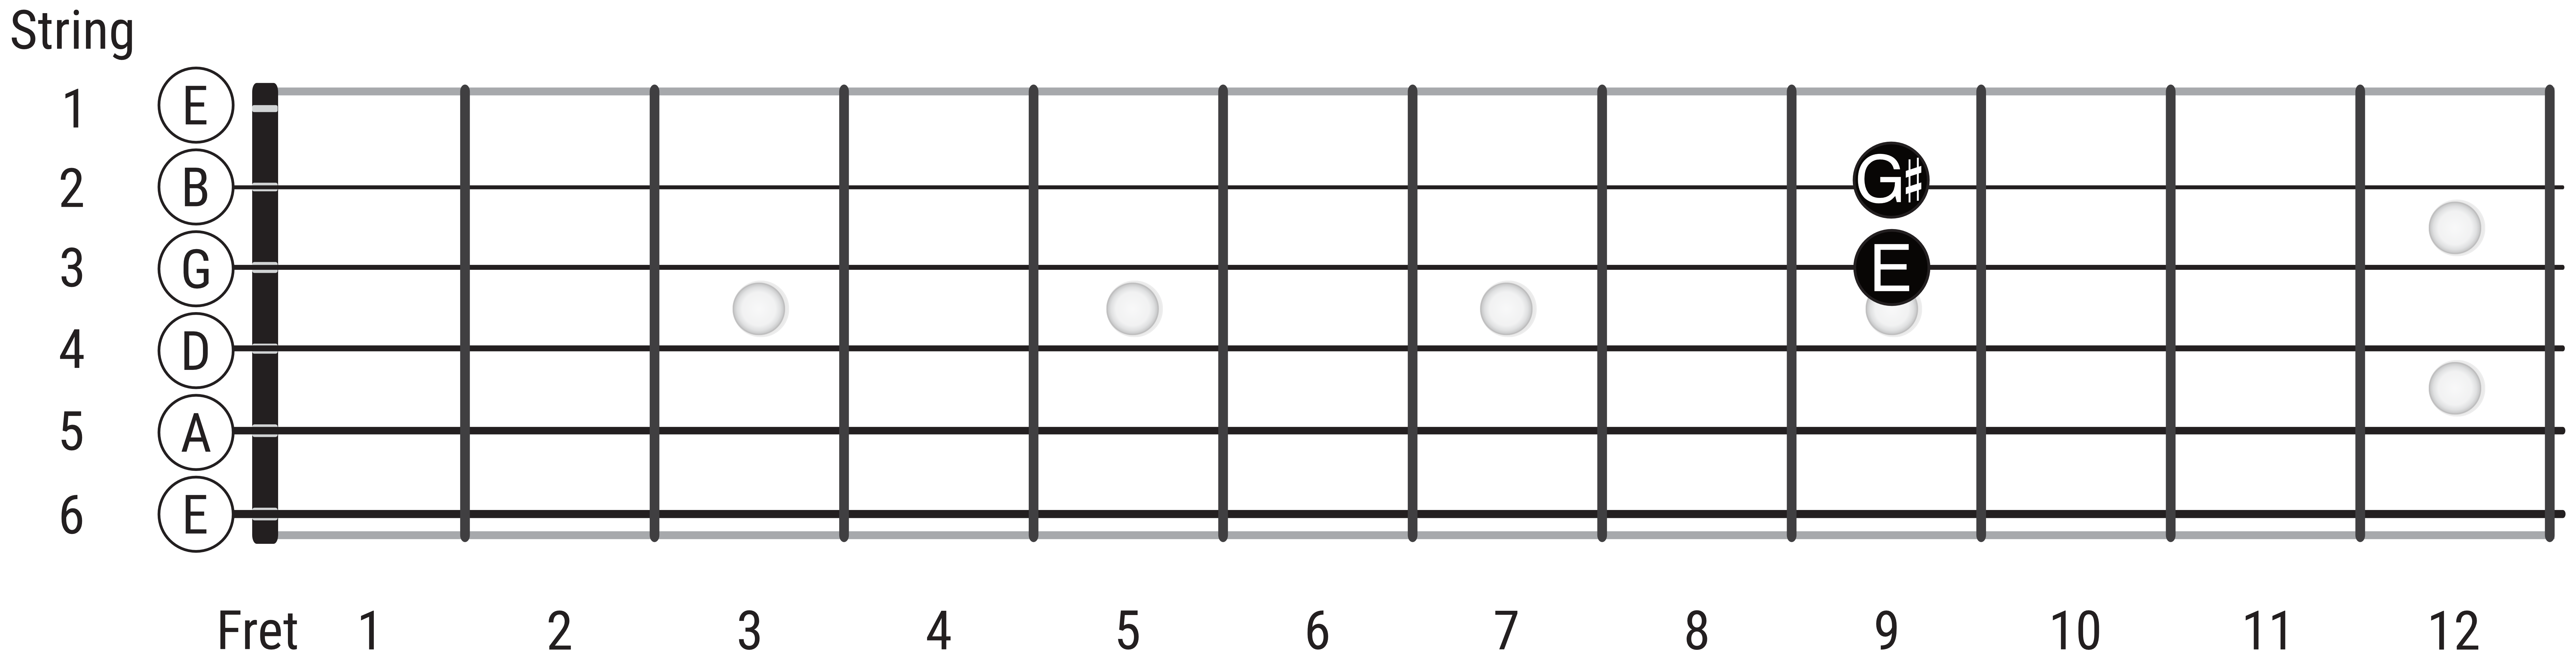
Same interval. Different shapes. Because the string tuning is different.
How It Works: Major Sixths
Same principle applies to sixths.
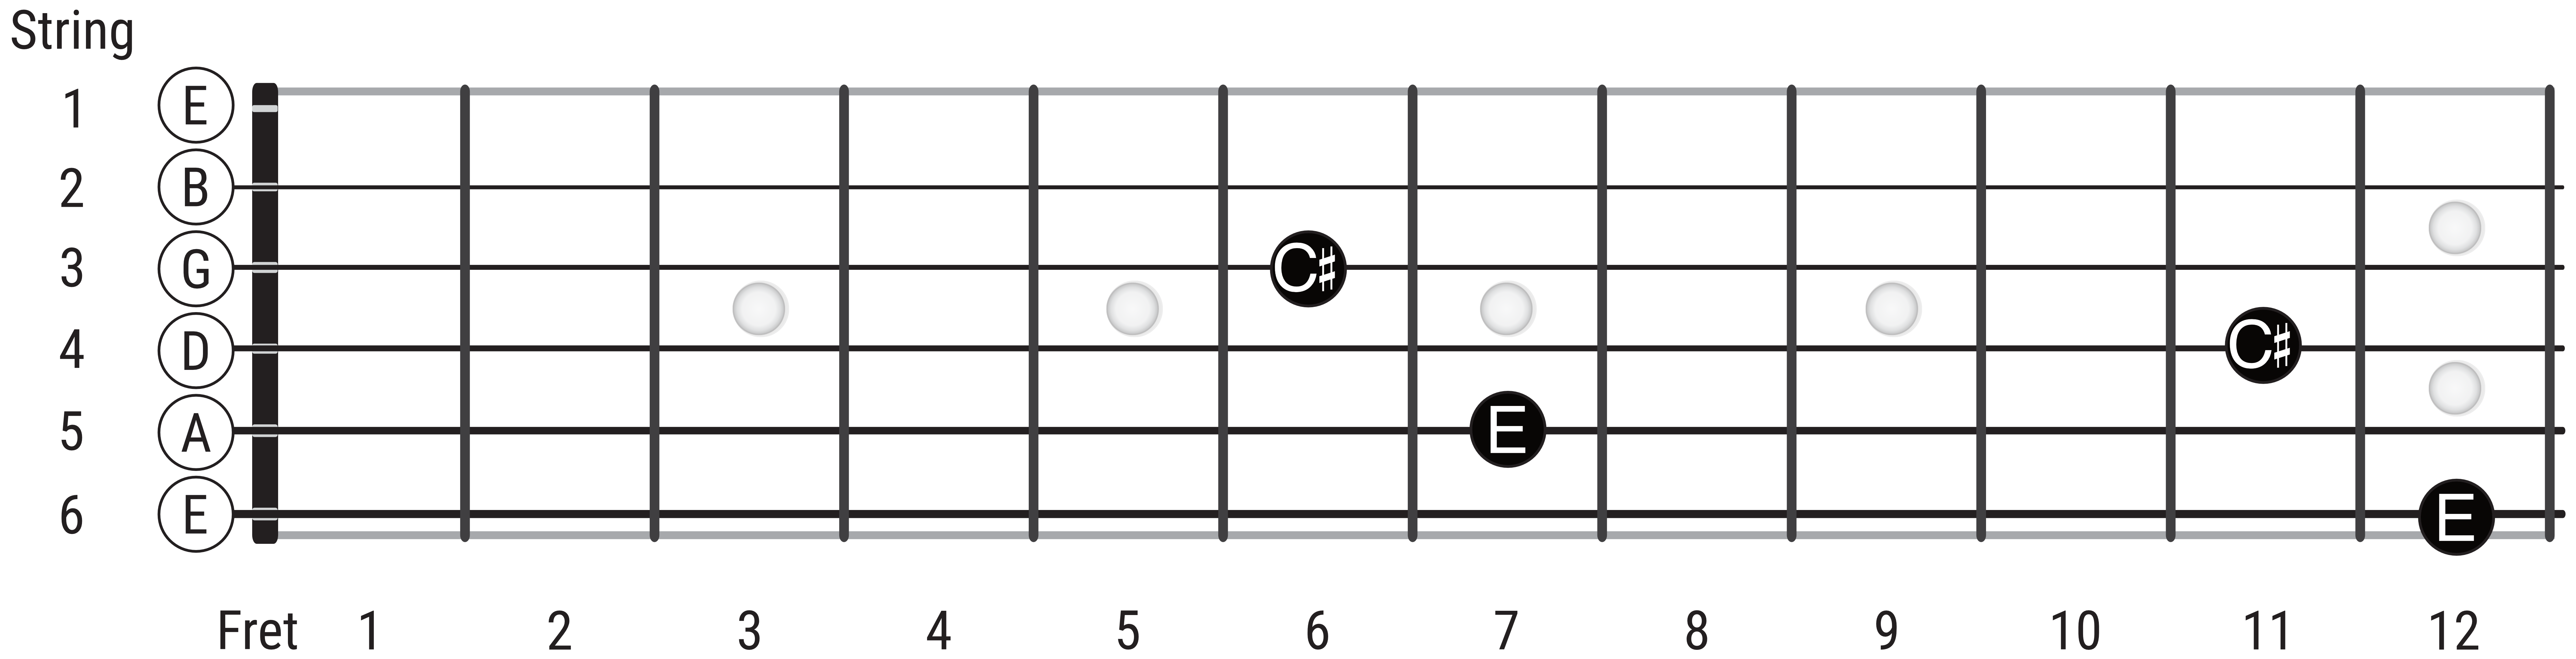
Major 6th WITHOUT the B string (A and G strings):
E on the A string (5th string), 7th fret
C# on the G string (3rd string), 6th fret
Shape: Up two strings, down one fret
E on the E string (6th string), 12th fret
C# on the D string (4th string), 11th fret
Shape: Up two strings, down one fret
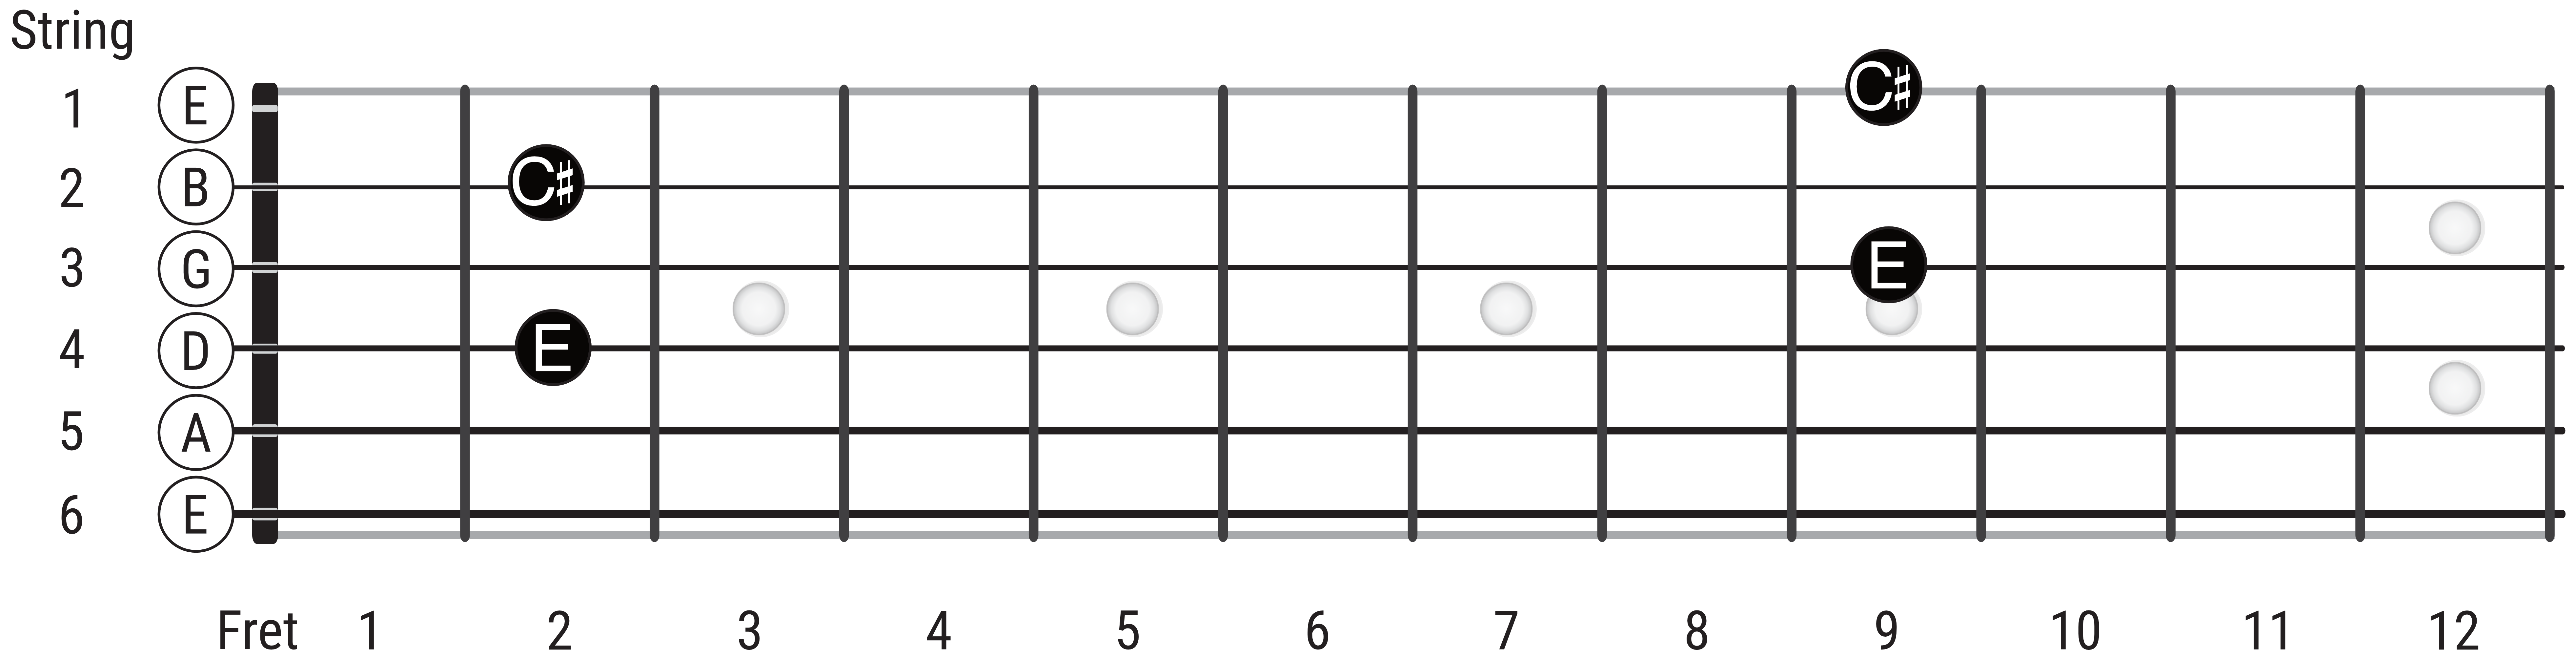
Major 6th CROSSING to the B string (D and B strings):
E on the D string (4th string), 2nd fret
C# on the B string (2nd string), 2nd fret
Shape: Up two strings, SAME fret
E on the G string (3rd string), 9th fret
C# on the E string (1st string), 9th fret
Shape: Up two strings, SAME fret
The Pattern
Here’s the rule:
When your interval shape crosses from the G string to the B string, shift the top note up one fret compared to what you’d play on strings tuned a Perfect 4th apart.
Or think of it this way: On the B string, the shape “straightens out.” Instead of going back a fret, you stay on the same fret (for adjacent strings) or adjust by one fret (when spanning multiple strings).
Why This Matters
Once you understand this, the entire fretboard makes sense.
You’re not memorizing hundreds of random shapes. You’re learning one shape with one adjustment depending on whether the B string is involved.
The adjustment is always the same: one fret.
Learn the standard shape on the lower strings first (E, A, D, G). Get that shape into your muscle memory. Then, when you move to positions that use the B string, remember the compensation.
It takes practice. Once your fingers and ears learn the adjustment, thirds and sixths become a lot easier accross the entire fretboard.
5. Connecting to the CAGED System
Here’s where it gets powerful: Thirds and sixths live inside the chord shapes you already know.
If you understand the CAGED system, you’ll start seeing these intervals embedded everywhere—in your C shapes, A shapes, G shapes, E shapes, and D shapes.
That “E shape” barre chord? The D and G strings are holding a Major Third.
Those triads you’ve been practicing? Built from stacked thirds.
The beauty of connecting intervals to CAGED you start seeing one continuous harmonic system.
[Download the Free CAGED Framework Guide]
Take what you’ve learned in this article and map it onto the CAGED shapes. Find the thirds. Find the sixths. See how they move through each position.
When you connect these concepts, the entire fretboard opens up.
This is a truely insightful guide; I'm curious if you have any preferred pedagogical strategies for addressing those specific 'blind spots' across different keys and fretboard areas, particularly in facilitating the transition from conscious theoretical knowledge to truly instinctive, performance-ready familiarity.